Monday 22 June 2020

Quick Pickled Bok Choy


Our weekly veggie boxes lately have been coming with a LOT of bok choy and I was at a bit of a loss when trying to figure out how to use it all. I'm not that much into bok choy, but had this thought one day that I could pickle it. I figured somebody must have done it before because everything is on the internet right? But when I did a quick search, apparently not. So I made up a quick pickle and gave it a go. It turned out so good that I pickle the bok choy straight from the veggie box every week. I can't tell you how long they'll last you in the fridge or cupboard, though. They don't last long in my house because my kids eat them straight out of the jar.

It's a very straightforward pickle. I used a warm pickle instead of hot because I didn't want the bok choy to get too "cooked", so it would retain it's nice crunch. Add any flavours you like - chilli, ginger, garlic, lemongrass, kaffir lime leaves. Our favourite variety is the ginger ones.

I use these pickles inside rice paper rolls, with Asian salads or noodle dishes. They add a lovely fresh crunch to a sweet/sticky tofu dish.

Now I just need to figure out what to do with all the leaves? I add them into other dishes in small amounts but can't seem to use them up in the quantity that I have them! Suggestions welcome :)


Ingredients:
2-3 bok choy, stems only
1 cup, boiling hot water
1/2 cup apple cider vinegar (you could also use white wine vinegar or rice vingear)
2 tbsp sugar
1/2 tsp salt


Additional flavours (optional): chilli, garlic, ginger, lemongrass, kaffir lime leaves. 

To Make:
1. Wash bok choy stems and cut into sticks. Put into a clean jar (pack them in tight because they shrink as they pickle).
2. Combine the boiling water with the sugar until dissolved and then add the apple cider vinegar and salt. 
3. Pour into the jar over the bok choy. If the quantity isn't quite enough you can top up with a little more vinegar and water to fill up the jar.
4. Put the lid on and store in the fridge overnight.

Makes approximately 1 x 500ml jar. 


Wednesday 27 May 2020

Vegan Pear and Rhubarb Cake


We get veggie boxes delivered these days, although I'm hoping that one day we'll grow so much fresh food that we won't really need to. I love the lucky dip nature of it, it's different every week and you figure out what you're going to make when it comes. Surprisingly though, it comes with pears pretty much every week. Much as I love them I've struggled to use them up in such quantity, leading to experimental cooking like this. This creation turned out fantastic!


Vegan Pear and Rhubarb Cake
Ingredients
3 ripe pears
4-5 rhubarb stalks
1 cup soy milk
1/3 cup canola oil
1/2 cup sugar (I use raw)
1 tsp vanilla extract
1 1/4 cups wholemeal flour
3/4 tsp baking powder
1/2 tsp bicarb soda
1 tbsp chia seeds
1 tbsp brown sugar

To make:
1. Preheat the oven to 180°C.
2.  Core 2 of the pears and chop into 1cm or so cubes, don't worry about peeling the skin. Chop the rhubarb stalks into 1cm lengths.
3. In a large mixing bowl, whisk the soy milk, oil, sugar and vanilla together.
4. Add the flour, baking powder, bicarb soda and chia and mix well to combine.
5. Grease a loaf tin (or a small round tin) well and line with baking paper.
6. Pour in the batter. Slice the remaining pear and use it to decorate the top with whatever pattern you like. Sprinkle the brown sugar over the top.
7. Bake for 45 minutes, or until a knife (or skewer) inserted into the middle comes out clean.
8. Cool in the pan and then use the sides of the baking paper to lift it out and serve.

Makes 1 loaf or 1 small cake. To make a full size cake you'll need to double the recipe.


Monday 4 May 2020

Weeds & Greens Salad with Finger Lime dressing


One of the good things about having a blog is using it to keep track of your own recipes. I haven't posted anything on this blog for years but I still come into it every now and then to look up one of my recipes to make. Everytime I log on to the blog I'm amazed at how much traffic it gets even though I haven't posted on it regularly for more than 5 years. When I see that it makes me feel like getting back onto it.

My life has changed a lot. But I thought I might try and post every now and then. It's going to be a be a bit different, it's going to be more real. I don't have the energy for perfect styled photos. I got rid of most of my "styling" props when we moved because I wanted a simpler life with less stuff. You'll get quick snaps on my phone, probably with kids hands reaching in to take the stuff right off the plate.

I've got 2 kids now but this is not a "mum blog", I've never had any desire to have a blog like that.

A year ago we moved into a new place and the house was everything we hoped for, with a bonus overgrown jungle as the garden. I'm passionate about growing our own food, but I've never seen myself as a forager. However, as I cleared sensational amounts of plants and weeds away to start to form our veggie patch, I realised we were probably already growing a lot of edibles without knowing it.


I checked out this book from the library and became a weed eater. I've come to view the weeds in our garden differently, for what they can do rather than just what they are. Our veggie patch is still a work in progress, but the garden always has a bounty to offer because weeds are everywhere!


Here's a simple recipe which represents where we're at right now. It's not much of a recipe really because it's so adaptable. Finger Limes are an Australian Native Citrus, with little bubbles of citrus inside like caviar. We've got a tree growing and had a nice crop this year, so I've used it here in the dressing. It's not available that widely, so just use some lime or lemon juice instead if you can't get them (if you can though - do it!!!). I recommend you plant one though, if you're in Australia, because they're just fantastic.

Weeds & Greens Salad with Finger Lime Dressing

1-2 cups mixed edible weeds, we used dock and oxalis mainly.
1-2 cups fresh rocket (we grew ours) or baby spinach
1 finger lime
1 tbsp olive oil
1 tbsp red wine vinegar
1 tbsp soy sauce
Edible flowers, to garnish (we've used oxalis flowers, you can also use violas, nasturtiums or Calendula petals).

Quick note: I recommend you do your research before eating weeds so you make sure you can identify what you're eating beyond a shadow of a doubt. Also both dock and oxalis are high in oxilic acid, so I wouldn't eat this salad every day. 

To make:
1. Toss the leaves together. 
2. Squeeze all the "caviar" out of the finger lime into a small jar and add the olive oil, vinegar and soy sauce. Shake/mix well and pour over the leaves. 
3. Garnish with edible flowers and eat right away. 

Thursday 23 February 2017

Vegan Basbousa


Last year was a very quiet year on Gormandize. I don't know how so many women seem to accomplish so much while raising tiny babies, but I salute them. I couldn't even begin to get my head around doing all the stuff I used to do before my baby came along. Caring for a tiny human, trying to keep my house moderately clean and working 2 half days a week already seems like an overwhelming amount to do. A lot of my personal interests have been put on hold.

Next week, my beautiful cheeky daughter turns one. I'm hoping this year to start exploring some of the things that used to occupy my time before her and this blog is one of them. Over the past few years I've put up about 380 free vegan recipes for you all to enjoy. That is a phenomenal database of delicious food. It has taken up a lot of time and resources! I won't be able to dedicate nearly as much time, effort and money to producing recipes for you all as I used to, but this blog will live on.

I've got a new project that I'm working on for Gormandize and I'm also going to be bringing you some new recipes this year. I hope you enjoy what I've got in store.

I'm starting you off with a firm favourite. I love this dish. I must have made it countless times. I hope you enjoy it as much as I do :)

Wishing you a prosperous Year of the Rooster!


Basbousa (Egyptian Semolina & Coconut Cake)

Ingredients
1/2 cup nuttelex (or other vegan margarine)
3/4 cup raw sugar
75g dessicated coconut (unsweetened)
1 cup semolina
1 tsp baking powder
1/2 cup plain wholemeal flour
3/4 cup almond milk
1 tsp vanilla extract
Whole blanched almonds, to decorate

Syrup:
2/3 cup caster sugar
2/3 cup water
2 tbsp lemon juice

To Make:
1. Start with the syrup, so it has time to cool. Place the sugar, water and lemon juice in a saucepan over a medium heat and stir until all the sugar is dissolved. Bring to the boil and then reduce the heat and let it simmer for 6-8 minutes, until it thickens. Remove from the heat and allow to cool. Once cool, chill in the refrigerator while you make the cake.
2. Preheat the oven to 180 degrees C. 
3. Melt the nuttelex in a saucepan and then add all the remaining ingredients except the blanched almonds, stir well to combine. 
4. Grease a square baking dish well and pour the batter into it, spreading it out evenly.
5. Bake in the oven for 30-35 minutes, until the top is golden. Remove from the oven and score lines diagonally across the surface. Pour the chilled syrup over the hot cake and then decorate each piece with a blanched almond in the centre. Allow to cool slightly and then serve either warm or chilled. 

You can check out my the other delicious Egyptian & Egypt-inspired recipes here

Thursday 4 August 2016

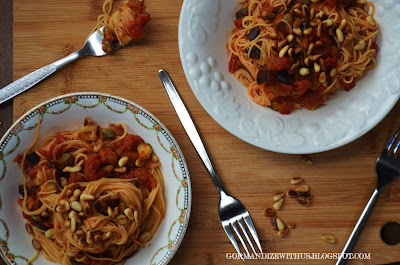
Roasted Vegetable Spaghetti with Capers and Pine Nuts


So many of my favourite ingredients come together to form this thoroughly comforting dish. You can use leftover roast veggies of any kind in it as well, you may just need to cut them up smaller.

Keeping my foot in the door with one post a month at the moment and hoping to be able to increase it soon!


Roasted Vegetable Spaghetti with Capers and Pine Nuts

Ingredients
1/2 medium eggplant, diced into 1cm cubes
1 zucchini, diced into 1cm cubes
Olive oil
Salt and pepper to taste
1 onion, diced
2 cloves garlic, finely minced
2 x 400ml cans of diced tomatoes
1 tbsp tomato paste
1 tbsp capers
2 tbsp pine nuts
300g thin spaghetti

To Make
1. Spray a baking tray lightly with olive oil and spread the diced eggplant and zucchini out. Spray with additional olive oil and season to taste with salt and pepper. Roast for 10-15 minutes at 180 degrees. 
2. Meanwhile, heat 1 tbsp olive oil in a pan and cook the onions and garlic until the onions are softened and translucent. Add the canned tomatoes and tomato paste and bring to a simmer.
3. Add the roasted veggies and simmer for up to 5 minutes, just to soften any that may have dried out in the roasting. Stir through the capers and leave on a very low heat to stay warm while you cook the pasta.
4. Cook the spaghetti to al dente according to the instructions on the packet, with thin spaghetti varieties this may only take a few minutes. Drain the spaghetti and stir the sauce gently through.
5. Toast the pine nuts in a dry frypan until golden and then remove from the heat immediately. 
6. Serve up the spaghetti and sprinkle generously with pine nuts. 

Makes 4 fairly modest serves or 2 very generous serves (or 3 just right?). 
Depends on how much you love pasta!


If you love pasta as much as I do, you might want to check out all my other pasta recipes too :)

Wednesday 15 June 2016

Tatws Popty (Welsh Oven Potatoes)


Tatws popty is a traditional Welsh dish of roasted meat and potatoes. The name translates as "oven potatoes" so I don't feel too bad for leaving out the meat and keeping the traditional name. It's a versatile dish, everybody's nain (grandmother) has her own way of making it. Since I've left the meat out of mine, I've added in some extra vegetables to make it a complete meal. It's such an easy and comforting dish and is perfect for this cool weather. White wine is not a very common addition, but adds a lovely sweetness - you could use beer instead if you wanted a 'meatier' flavour to the dish.

Tatws Popty

Ingredients
6 large floury potatoes, peeled and cut into sixths (or just large chunks)
1 leek, washed and chopped into large pieces
1 large parsnip or swede (or both if you like), peeled and chopped into large chunks
1/3 cup vegan margarine/butter
3 tbsp olive oil
4 onions, peeled and thickly sliced
14 garlic cloves, peeled
2 bay leaves
2-3 sprigs thyme
1/2 cup white wine
2/3 cup beef stock (no animal content, such as Massel), or vegetable stock
Salt and pepper to taste

To Make:
1. Preheat the oven to 180 degrees celcius and prep all your veggies.
2. Heat a large casserole dish or roasting pan on the stove (if you don't have a suitable dish, you can use a frypan and then transfer to a casserole dish) and add the margarine and olive oil. Once melted, add the onions, garlic cloves, bay leaves and the thyme. Cook for 8-9 minutes, stirring frequently, or until the onions have started to brown. 
3. Remove from the heat and add the leek and the parsnip and/or swede to the dish, followed by the potatoes on top. Pour over the white wine and the stock. 
4. Seal well with foil (or a lid) and bake in the oven for 1 hour, or until the potatoes are completely cooked through. 
5. Remove the foil or lid and switch the oven to the grill setting and leave in until the potatoes are crispy and browned on top. Season to taste with salt and pepper. 

Have as is, or add some steamed green veggies.

Serves 4-6. 


I'm featuring lots of recipes from the United Kingdom,
Check out my other recipe posts here:

Friday 13 May 2016

Vegan Bakewell Tart


It's been quiet on the blog front lately, as I'm somewhat otherwise occupied these days with my beautiful two month old daughter (!). In fact, not only do I barely blog anymore - I barely ever cook anymore! My partner comes home every night and cooks dinners as I have my hands full and have usually had a pretty full on day. As for lunches, even if my lovely baby decided to sleep for longer than 40 minutes at a time (gah!), I certainly wouldn't feel like cooking (and photographing) delicious gourmet meals. In fact I always have to hope there are leftovers, otherwise I might not get lunches at all!

I don't want to let the blog completely wither and die though. Luckily, I have some photos and recipes filed away that I haven't gotten around to posting yet from way back when I was featuring United Kingdom recipes. It might take me more than one 40 minute nap to get each post up, but I'm keen to get back to it - especially since I've been contacted by readers who miss my posts :)

The posting will be less frequent than previously, at least for now - but I'm still here :)


I'm actually really excited to share this one with you, partly because I just love the photos of it and also because it was delicious and easy to make. It's called a Bakewell Tart, and it's a classic English afternoon tea delight. It's shortcrust pastry filled with jam and topped with almond-y frangipane. 

A couple of notes on mine, before I go on to the recipe. 
- I've used only 1/4 tsp almond extract, because I've never really been a fan of the taste of almond extract. It would be more traditional to use more, so if you like the taste feel free to up it to a tsp.
- Mine (you might see in the pics) came out slightly undercooked, so I've added an extra 5 minutes to the cooking time. This will vary anyway, depending on your oven, so use your own discretion. 
- I've used raspberry jam here, you can also use cherry or strawberry. 
- The jam is meant to make a nice distinct layer that you can see when sliced. I looked at some other blog pictures of Bakewell Tarts before and thought their layers of jam looked a little thin, so I added mine very generously. Alas, it still seemed to get absorbed by the frangipane during baking and didn't make much of a distinct layer when sliced. I'm sure if I was on the Great British Bake-Off, such a sin would be the end of me. If you don't care about that kind of thing, then don't worry because it still tastes crazy good. If you want to try and get the jam layer nice and distinct then I would suggest adding a super generous amount of jam - and then adding a whole heap more. 


Vegan Bakewell Tart

Ingredients

For the pastry:
250g plain wholemeal flour
125g margarine
Ice cold water

Everything else:
170g caster sugar
170g self raising flour
1/2 tsp baking powder
170g almond meal
1/4 tsp almond extract
150ml canola oil
200ml water
Raspberry jam
Icing sugar, to decorate

To Make:
1. Preheat your oven to 190 degrees C. 
2. Put the pastry ingredients in a food processor and blitz until the mix resembles fine breadcrumbs (alternatively, use your fingertips to rub the margarine into the flour until the same consistency), then add just enough ice cold water for it to come together as a dough ball. It shouldn't stick to your fingers when you touch it, if you slip up and add a bit too much and end up with sticky dough then just add a little more flour until you get it right. 
3. Roll out the dough to about 3mm or so and line a tart tin with it (one with a removable bottom is best). Prick the base with a fork and bake for 10 minutes.
4. Meanwhile you can mix together all the other ingredients except the jam and the icing sugar.
5. Spread a generous layer of jam over the pastry base and pour the frangipane batter over the top. Bake for 10 minutes and then lower the temperature to 180 degrees C and bake for a further 30 minutes. 
6. Leave it to cool and then decorate with icing sugar. You could also decorate with flaked almonds, if you like. 


I'm featuring lots of recipes from the United Kingdom,
Check out my other recipe posts here:

Tuesday 16 February 2016

Home Made Cocoa Bread


Home made bread is such a lovely treat, every time I make some I always think to myself that I should make it more often. But, then modern life gets in the way. So, I still only rarely bake bread. When I do though, I don't like to make plain standard breads. Cocoa is one of my favourite additions to bread. No, it's not chocolate bread! It would only be a sweet chocolate bread if you also added lots more sugar to it. The cocoa adds a deep richness and ever so slight bitterness to it, which is so divine.

I love these kinds of breads in winter, served with soup or tagine or casserole. But they're also wonderful in summer because they're lovely to snack on and to use for summery open sandwiches. When it's freshly baked I love just eating it in slices with just vegan margarine, nothing else needed!

Nuts can be a nice addition to this bread, and can be added (about 1/2 cup) during the second kneading.


Cocoa Bread

Ingredients
2 tsp yeast
1/4 cup warm water
1/4 cup unsweetened cocoa powder
1/4 cup sugar
1/2 tsp salt
1 cup soy milk
3 tbsp vegan friendly margarine
2 1/2 cups plain flour

To Make
1. Combine the yeast and warm water set aside, this should become frothy and smell very yeasty. If it doesn't froth up on top, check to see that your yeast is in date.
2. Mix the cocoa, sugar and salt in a large bowl. Warm the milk in a saucepan and then remove from the heat and add the margarine. Combine this with the cocoa, sugar and salt in the bowl. Cool slightly and then add the yeast mixture. 
3. Add enough flour to come together into a dough. I'd suggest adding the two cups and then adding the 1/2 cup gradually as needed until you reach the right consistency. The dough should not stick to the edges of the bowl or your fingers, but should be sticky enough to stay together in one ball without crumbling. If it is too sticky, add a little more flour. 
4. Roll into a ball. Knead on a floured benchtop for 5-8 minutes, until smooth and elastic. 
5. Dust the mixing bowl with flour and place the dough back in. Cover with a tea towel or plastic wrap and leave in a warm spot to double in size (probably about an hour). 
6. Punch down the dough and knead briefly again. Place on a greased (or lined with greaseproof paper) baking dish or baking tray and shape into a nice loaf shape. Cover and allow to rise again until double (or almost) in bulk). 
7. Preheat the oven to 180 degrees C while you're waiting for it to rise again. Use a pair of scissors or a sharp knife to cut some slits in the top of your loaf and then bake for approximately 1 hour. 

Makes 1 loaf. 


Saturday 5 December 2015

Moroccan Spice Mix (Edible Christmas Gifts)


Edible Xmas gifts are a passion of mine, because most people I know don't need more stuff and home made consumables are such a nice thing to give. I've tended to try and go on the healthy side the last few years, making Tomato Vodka Pasta Sauce Gift Packs, Cornbread in a Jar (2 kinds) and Bean Soup in a Jar. Also in keeping with the less-sugary-treats theme (but so much 'healthy') I've also made lots of infused vodkas - chilli, raspberry and strawberry lime.

I've been blogging for years now, and still trying to come up with new and different ideas to share for home made Xmas pressies. This year* I've gone with a theme of home made spice blends, giving away my own home made Garam Masala and also this beautiful Moroccan Spice blend. I like to try and give some guidance with my gifts though, so I've written a basic recipe on the label to help my recipients use it up.


* actually, I'll let you in on something. I hate to spoil the surprises for my family and friends by blogging about their Xmas presents before they even get them, so each year I blog about last years home made Xmas gifts. These spice blends were part of my gifts last year :)


I've started by toasting some of my spices, because I just love to do it. You can simplify the whole process and just mix pre-ground spices if you prefer. Get some little jars with good sealing lids, so the spice blend keeps nice and fresh for as long as possible. If you want to add the the gift you could combine it with some good quality couscous, a jar of Preserved Lemons or even a tagine. 

Moroccan Spice Mix

Ingredients
3 cinnamon sticks (you can substitute 1/4 cup ground cinnamon)
1/4 cup black peppercorns (you can substitute ground black pepper)
1-2 dried chillis (more or less to taste, you can substitute 1/4 cup cayenne pepper)
1/2 cup cumin seeds (you can substitute ground cumin)
1/2 cup ground ginger
1/4 cup smoked paprika
1/4 cup turmeric

To make: 
1. Combine the cinnamon sticks, peppercorns, dried chillis and cumin seeds in a dry frypan and toast until fragrant. Crush in a spice grinder/coffee grinder/food processor/mortar and pestle into a fine powder. 
2. Add in the ground ginger, smoked paprika and turmeric. 
3. Divide into small jars with tight sealing lids. 
Makes about 2 1/2 cups spice mix, will keep for several months. 

Write a label with a basic recipe if you like, here is what mine said:


Tuesday 1 December 2015

Yule Mule (Cocktail)


Ever since I made this delicious Dutch Orange Bitters, I've been keeping an eye out for cocktails to use it in. This Yule Mule is (as you can tell by the name) a traditional Yuletime cocktail, but really is great any time of the year. It's incredibly refreshing on a hot Australian summer day, so bring it out at your family Xmas this year. You could even give gifts of little bottles of home made Orange Bitters to family with a copy of the recipe for this cocktail so they can replicate it at home.


How are you going for Xmas gift ideas? If you're a bit stumped, or are looking to add in some home made edible stocking fillers then Gormandize has definitely got you covered! Small edible gifts are also great for colleagues, teachers or neighbours who you want to give a gift to but don't know that well and don't want to spend too much on. All this month starting tomorrow, I'll be sharing Christmas Gift ideas on the Gormandize facebook page. Don't worry, they're not all just different types of biscuits in jars - they're very varied. Follow the page on facebook to get all these nifty ideas in one place. 


Yule Mule

Ingredients
1 1/2 measures of vodka
1/2 measure fresh lime juice
1/2 measure cranberry juice
Dash of orange bitters 
3 measures ginger beer

To Make
1. Combine vodka, lime juice, cranberry juice and orange bitter. Shake well and strain into a highball glass half filled with ice.
2. Top up with ginger beer and serve. 

Makes 1 drink - multiply by however many people you're making it for.